Performing an Audit

Performing an Audit

Once an audit has been prepared, it is ready to be performed.

NOTE: Click the View Task Status button in the menu bar of the audit to view the current progress of the audit

  1. From the Audit Workspace dashboard > Audit - All Open Tasks tab on the Portal Page, click the Perform Audit link to the appropriate record.
    Result: The Perform Audit window is displayed.

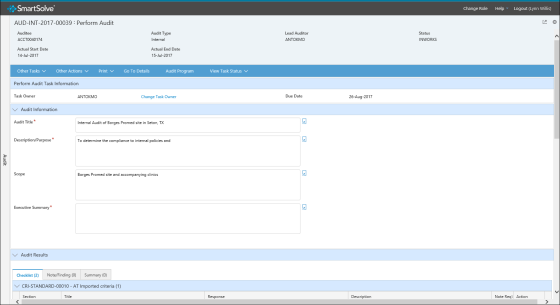
  1. Enter information in the following sections:
Section Description

Perform Audit Task Information

Displays the Task Owner and the Due Date. Click the Change Task Owner link to assign this task to another user.

Audit Information

Enter the information in the following section. This information defaults from the previous task.

  • Audit Title* - Enter a unique name for the audit. The information in this field defaults from Prepare Audit.
  • Description/Purpose* - Enter a description of the audit. The information in this field defaults from Prepare Audit.
  • Scope - Define the scope of the audit. The information in this field defaults from Prepare Audit.
  • Executive Summary - Enter an executive summary for the audit.

Document

The Document section is displayed if a document was attached to the audit during audit preparation. This section allows the auditor to easily refer to referenced documents while performing an audit.

  • Document Number - Displays the number of the document.
  • Document Revision - Displays the revision of the document. If the document is stored in Document Management, click the View link to open the document in the document viewer.
  • Title - Displays the name of the document.

Audit Results

Checklist Tab

Enter the information in the Checklist tab:

  • Section - Respond to the section questions:
  • Response* - Specify whether the section was passed, failed, or skipped. If Fail is selected, then a note may be required based on the Response Type setup. To expedite the process, select a response and then click the Mark All link. The application populates all of the question responses in that section with the section response that was selected. This can be used to respond quickly to complete the criteria. The user can then go back to enter notes and findings.
  • Description - Enter a description.
  • Note Req? - When checked, a note/finding is required for this section. This checkbox defaults based on the Response Type setup.
  • Action - Click the Add Note link to add a note for the criteria in the Note/Finding tab. When selected, the criteria, section, and description information will be carried over and defaulted within the note/finding.
  • Question - Respond to the section questions:
  • Response* - Specify whether the question was passed, failed, or skipped. If Fail is selected, then a note may be required based on the Response Type setup.
  • Description - Enter a description.
  • Note Req? - When checked, a note/finding is required for this section. This checkbox defaults based on the Response Type setup.
  • Action - Click the Add Note link to add a note for the criteria in the Note/Finding tab. When selected, the criteria, section, question, and description information will be carried over and defaulted within the note/finding.

NOTE: If the audit score is being calculated by criteria responses, click the Save button after completing the checklist to refresh and display the score information. The method for calculating the audit score is defined in the audit type.

Audit Results

Note/Finding Tab

Click the Add Note/Finding link to add a note/finding if the notes were not added from the Add Note link in the Checklist tab. Enter the information in the fields:

  • Note Type* - Click the drop down button and select the type of note, such as Critical Finding or Minor Finding. For more information on configuration, see Note Types.

NOTE: The Note Type selected changes the policy automatically.

  • Criteria - Click the drop down button and select the criteria that the note is in reference to. This field defaults from the relevant Section or Question from the checklist and should not be changed.
  • Section - Click the drop down button and select the section of the criteria that the note is in reference to. This field defaults from the relevant Section or Question from the checklist and should not be changed.
  • Question Number - Click the drop down button and select the question of the criteria that the note is in reference to. This field defaults from the relevant Section or Question from the checklist and should not be changed.
  • Is Repeat? - Specify whether or not the finding is a repeat finding from a prior audit.
  • Include in Follow-up? - Specify whether or not the criteria and section from the note should be included in the follow-up audit.
  • Requires Action Plan? - Specify whether or not the finding requires an action plan.
  • Requires CAPA? - Specify whether or not the finding requires a CAPA. If Yes is selected in this field and:
  • CAPA Management is not being used, then a Manage External CAPA task will be created and assigned.
  • CAPA Management is being used, then a CAPA will be created and assigned automatically .
  • CAPA Against - If a CAPA is required, specify whether the CAPA is against the Product or the Process. This field is only visible if Yes is selected in the Requires CAPA field.
  • Site - Click the drop down button and select the relevant site. For more information on configuration, see Organization Units.
  • Department - Click the drop down button and select the relevant department. For more information on configuration, see Organization Units.
  • Process - Click the drop down button and select the relevant process. If a CAPA is required and CAPA Against is Process, this value will be transferred to the CAPA record.
  • Product - Click the drop down button and select the relevant product. If a CAPA is required and CAPA Against is Product, this value will be transferred to the CAPA record.
  • Description - Enter a description of the finding. This field defaults from Checklist, but is editable.

NOTE: For Minor findings, this field will transfer to the Response. For Major and Critical findings, this field will transfer to the CAPA Description.

  • Recommended Action - Enter the recommended action for the finding. For Minor findings, this field will transfer to the Response.
  • Assigned to User* - Enter or zoom to select the user assigned to the finding. This field defaults to the primary contact.
  • Assigned to Role* - Enter or zoom to select the user role assigned to the finding. This field defaults.
  • Performed By* - Enter or zoom to select the user who documented the note/finding. This field defaults to the user who created the note.

NOTE: If the audit score is being calculated by findings, click the Save button after completing the Audit Results section to refresh and display the score information. The method for calculating the audit score is defined in the audit type.

Evidence Person (Note/Finding Tab)

Click the Add Evidence Person link to add information about the person who was witnessed the evidence for the note/finding. Enter the information in the following Evidence Person section fields:

  • Name* - Enter the evidence person's name or zoom to select a user/actor.
  • Phone Number - Enter a phone number for the evidence person.
  • E-mail - Enter an e-mail address for the evidence person.
  • Description - Enter a description, if applicable.

Attachment

(Note/Finding Tab)

If needed, the auditor can add an attachment to the note/finding. To add and attachment, click the Add Attachment + link and then browse to select files to attach. Click the OK button.

NOTE: A photo can be attached here.

Audit Results Summary Tab

Click the Add Auditor Summary link to add an auditor summary to the audit. Enter the information in the following Auditor Summary section fields:

  • Note* - Enter a note regarding the audit.

Attachment

If necessary, click the Add Attachment + link and then browse to select files to attach. Click the OK button.

  1. Click the Sign-off button.
    Result: The Sign-off window is displayed.
  2. Enter your user ID and password and then click the Sign-off button.
    Result: The Result window is displayed. The Result window is a window that displays after the audit is performed and asks the user where they would like to go next, such as to the Audit Detail, to the Review Finding step if the same user is assigned, or back to the Portal Page.

See Also

Creating an Adhoc Audit

Creating a Planned Audit

Preparing an Audit

Managing an External CAPA

Verifying Audit Completion

Verifying Action Plan Effectiveness

Following Up on an Audit

Generating an Audit Summary Report

Audit Other Actions


Wednesday, December 4, 2019
12:03 PM